Zucchini Pad Thai

So. I am obsessed with this dish. Why? It somehow manages to make vegetables feel like that satisfying noodle bowl at your nearby neighborhood Thai spot. Even Alex, whom I served this to, was almost convinced they were rice noodles. The noodles are made of zucchini, and they exude brilliance. Processed with VSCOcam with f2 preset

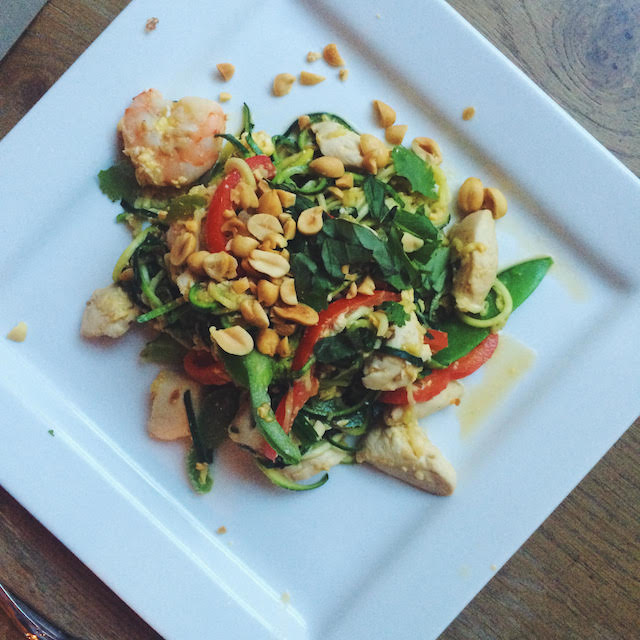
Spiralizers should be in everyone's kitchen. They transform a vegetable from the typical shape to a beautiful pasta substitute. Spiralized veggies Italian style? Sure! Asian style? Why not. Below is my rendition of a zucchini noodle pad thai that will absolutely impress and possibly trick your dinner guests.

Processed with VSCOcam with f2 preset

Makes 2 (large) servings

Noodles:

2 medium zucchini, spiralized 2 tablespoons olive oil, divided 1/4 pound peeled and de-veined shrimp 1/4 pound chicken, cut into 1 inch cubes 3 large cloves garlic, minced 1 cup bell pepper, snow peas, broccoli, etc. (The grocery usually has a nice pre-packaged stir fry mix!) 3 green onions, sliced in 1" pieces 2 large eggs 1/3 cup roasted peanuts Cilantro and thai basil (optional)

Sauce:

2 tablespoons rice vinegar 2 tablespoons fish sauce 1 tablespoon low fat peanut butter 1 tablespoon Soy Vey marinade 1/2 teaspoon cayenne pepper or red pepper flakes

1. Combine sauce ingredients in a small bowl. Set aside.

2. Use a spiralizer to cut zucchini into thin noodle-shapped ribbons.

3. Heat a large wok on medium-high heat. Add one tablespoon of olive oil and zucchini noodles. Cook for about 2 minutes, stirring constantly. Do not overcook! 

3. Remove wok from heat and let the noodles rest for about 3 minutes to allow all the moisture to release. Transfer noodles to a colander and drain excess water.

4. Carefully wipe down the wok with a paper towel.  Reheat wok on medium-high heat, and add one tablespoon of olive oil and garlic. Cook the garlic until translucent, about 1 minute. Add the shrimp and chicken, and cook until tender, 4-5 minutes.

5. Add the vegetables and green onions. Cook for 2 minutes, or until tender. Break the eggs directly in the wok, and stir constantly with the vegetables until the egg is cooked.

6. Add the zucchini noodles and sauce into the same pan. Cook until the zucchini noodles are heated through.

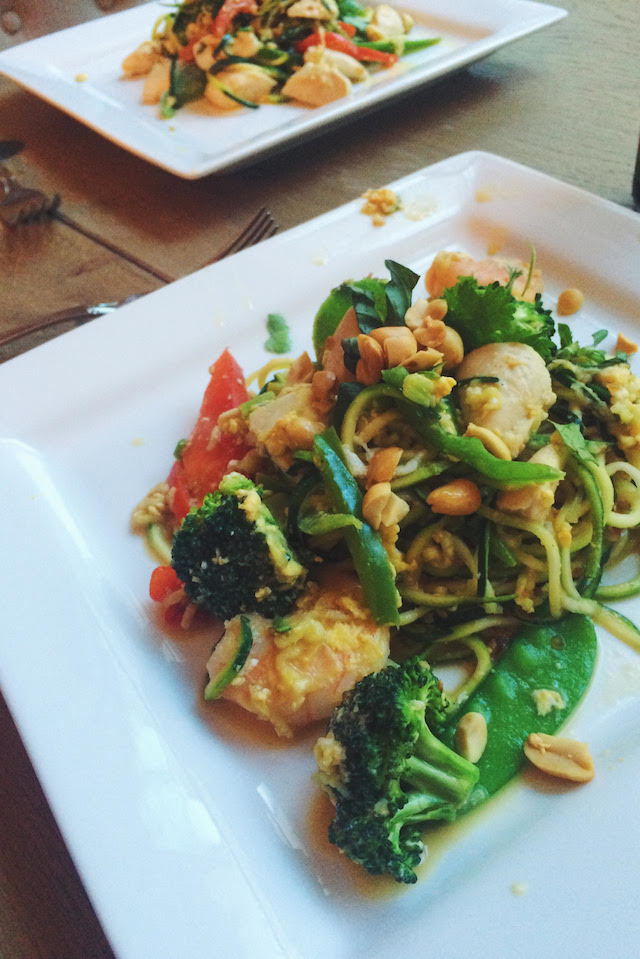
7. Serve the zucchini pad thai with roasted peanuts, thai basil and cilantro.

recipe adapted from white on rice couple

Rooftop Seafood Dinner with Lesouque

I'm all about a summer al fresco dinner; and when Lesouque sent me an adorable pair of oyster-studded linen napkins, I knew a seafood spread was in order. Jumbo fresh gulf shrimp and mussels made the top of on the farmers market list, as I was eager to experiment simple recipes for a rooftop evening. On the menu: A bottle of Stepping Stone's crisp sauvignon blanc, steamed mussels with garlic and white wine (recipe below), shrimp with fava beans (look for the recipe next week!), and squash with basil ribbons.

IMG_6956

Lesouque is a carefully curated online boutique, bringing refreshing finds from independent designers worldwide.

Growing up in Turkey, Founder Gokben Yamandag always had a keen desire to introduce the talents of her home country beyond its borders. While her initial idea focused on featuring one-of-a-kind items crafted by talented independent designers in Turkey, it has quickly evolved to include pieces from designers and artists from other countries and cities she has lived and visited - from London to Austin, Copenhagen to Mumbai, Paris to New York and most places in between.

IMG_6961

Gokben & co-founder Penelope Fisher work together to uncover talented designers and carefully hand-pick each item displayed on the website. It’s important to the duo to not only know the story behind each product, but also to know each designer personally.

IMG_6953

IMG_6951

Click here for exclusive early access to the site's pre-sale product lines. You'll get first dibs on small batch products, such as these adorable Nell & Mary oyster linen napkins, stacking thimble cups for condiments, and my friend Brit McDaniel's Paper & Clay ceramic line.

Once you've signed up, keep scrolling for a super manageable mussels recipe. I couldn't believe how simple these were to prepare. The aromatic flavors of fresh garlic in simmered wine took me back to my summer in Paris.

IMG_6954Makes 2 servings

2 pounds frozen mussels, rinsed in tap water 1 onion, sliced 4 cloves garlic, sliced 1 cup white wine 1 tablespoon olive oil

1. In a large saucepan, heat olive oil over medium heat. Add onion and garlic, and cook until translucent (approximately 5 minutes).

2. Add wine and mussels. Cover and reduce heat to a simmer for 5-7 minutes, or until shells are popped open. Serve immediately as an appetizer or main course.

This post is in partnership with Lesouque. Thank you for being supportive of my sponsors!

Grilled Peaches with Honey and Mint

IMG_6905 My weekly trip to the Memphis Farmers Market has reached a new level -- the peach farmer (first booth on your right from the main entrance) recognizes my routine visit. I hate to waste an entire basket of ripe peaches, so he lets me take 2 for a dollar, or 4 for $2. It's a super sweet gesture for my favorite fruit of the season.

Grilled fruit is a go-to side dish or salad base for my summer meals, particularly because the natural caramelization is so irresistible! I add a few drops of Nature Nate's before throwing them on the heat; and 5 minutes later, they're ready to go.

For a richer application, my friend Justin Fox Burks of the Chubby Vegetarian throws his grilled peaches in a dutch baby with fresh, creamy burrata cheese. The heavenly fruit and cheese combination could serve as a light salad or more savory dessert option.

Enjoy the rest of your summery weekend!

IMG_6909

Makes 2 servings

2 peaches, pitted and quartered 2 sprigs fresh mint 1 tablespoon Nature Nate's honey 1/2 teaspoon coarse sea salt

1. Spray nonstick spray on a grill (or grill pan) over medium heat. Brush peach slices with honey.

2. Place peaches, skin side up, on grill. Allow fruit to caramelize for 4-5 minutes until grill marks appear.

3. Immediately plate peaches. Top with torn pieces of mint, sprinkled sea salt, and a bit of extra honey if you're in need of some more sweetness.

Share your own Nature Nate’s honey creations on social media with @naturenates and #honeymakesitbetter!

IMG_6911

This post is in partnership with Nature Nate's. Thank you for being supportive of my sponsors!

Processed with VSCOcam with f2 preset

Grill Out and Chill Out

This post was made possible by Longhorn Steakhouse. Thank you for supporting our sponsors! Happy June! 'Tis the season for summertime grilling galore. Though I will miss my weekend habit of schmoozing at Tennessee Brewery: The Revival beer garden during the months of April and May, I am pledging to move past my fear of the grill and prepare some memorable summer dinners.

IMG_6400


I personally do not own a grill but am lucky to share a rooftop community grill for my Downtown apartment building. It's fantstic to call "dibs" and gather friends for a sunset gathering. Last weekend on Memorial Day, upon receiving some swanky grilling goodies and tips from Longhorn Steakhouse, I planned a beautiful, doable meal of grilled shrimp skewers, filet, okra and brussels sprouts. You've got to try it!

Processed with VSCOcam with f2 preset

Follow along for some tips to entitle yourself an official "grillmaster" in no time...

1. Prep your surface. Your grill should be hot (about 500 degrees) and cleaned with a wire brush. Place your hand three inches above the grates, and count to three. If you need to pull your hand away before you hit “three,” it’s ready.

2. Prevent sticking. Before you put anything on your grill, rub the grates with an old wash cloth dipped in a small amount of oil. Use your tongs to handle the washcloth so that you don’t risk burning your hand.

3. Get in the zone. If you’re working with a large gas grill, create cooking “zones” by keeping one section at a lower temperature. As your meat and vegetables start to cook through, you can move them to a cooler area to slow down the process.

4. Tools of the trade. Keep everything you need within reach: metal spatula, heavy duty metal tongs, a good grill brush and a small squirt bottle (used to douse any flare-ups).

5. Select fresh proteins and vegetables. If you’re planning to serve steak, filets, sirloins and ribeyes are best on the grill – just be sure they’re fresh, never frozen.

6. Boldly season. Don’t be shy when seasoning your steak! Go bold. For an at-home rub, try “The Big 4” – salt, pepper, granulated onion powder and granulated garlic powder.

7. Sear-in diamond marks. Searing locks in flavor, as well as creates those great grill marks synonymous with summer. Grill your steak for 2-3 minutes on one side, then give it a quarter turn. Flip and repeat.

8. Test for doneness. With a meat thermometer, steaks should be at minimum 120-130 degrees if you like it rare, and up to 170 degrees, if you prefer your steak well-done.

9. Handle with tongs. Only use tongs to touch your meat. Poking with a fork to rotate or pull it from the grill will let the juices and flavor out.

10. Give it a rest. Make sure you let your steaks and other proteins rest for 2-3 minutes before serving. This will allow the juices to settle back into the meat, resulting in optimal flavor.

Tips provided by Longhorn Steakhouse's executive chefs. Thank you for supporting our sponsors!

Summer Green Pea Medley

IMG_6421.jpg

Y'all, I just discovered a new love affair with Sprouts Farmers Market, which just opened in a suburb of Memphis. The produce is particularly gorgeous and colorful, especially this time of year. Above all else, it's affordable. I gathered fruits and vegetables of all shapes and sizes to accompany my fish and chicken this week. Somehow, Sprouts has pushed me to be excited for a healthy week of eating ahead! Here is a super, super simple green side that'll be ready to plate in under five minutes. It's protein-fiber-filled and carb-free. I'm addicted to the nutty, crunchy textures of the medley.

IMG_6419

Despite it s ridiculous simplicity, I hope you'll look to this recipe for inspiration with summer produce. As I always like to say, it's about highlighting the ingredient -- no sauce necessary!

Makes 2 servings

2 handfuls French green beans, washed and trimmed 8 pods fava beans, shelled 1/4 cup edamame, shelled 1/4 cup green peas Truffle or olive oil, to drizzle Sea salt and pepper

1. Bring one medium pot of salted water to a boil. Prepare an ice bath beside the stove.

2. Add beans and peas to water and blanch for 1-2 minutes until vegetables are bright green. With a slotted spoon, remove vegetables and add to ice bath to freeze further cooking.

3. Remove vegetables from ice bath and plate. Drizzle with oil and sprinkle with salt and red pepper flakes. Serve alongside...anything! I enjoyed mine with white cod and Rainier cherries.

IMG_6415

Spring Salad with Egg

IMG_5898.jpg

Good morning, ladies and gentlemen. I awoke with a Grizzlies hangover, if you will. Yesterday's late night loss has put me in a complicated funk, though this recipe is anything but. It's simple and delightful. In fact, I might make it again today.

Processed with VSCOcam with f2 preset

In my opinion, lunches like these kickstart a feeling of refreshment. I felt proud for not guiltily eating a loaf of bread while still feeling full and fabulous. It's proven that protein is a must...So, when in doubt (or in loss of chicken or fish in your refrigerator), put an egg on it. I think you'll enjoy this one. If you make a version of it, be sure to share!

Makes 1 serving

3 radishes, thinly sliced 1/2 cup shelled edamame, steamed 1/2 avocado, cubed 1/2 cup sugar snap peas, halved 1 egg Sea salt and pepper

1. Heat a small skillet over medium heat. Meanwhile, add prepped vegetables to a bowl.

2. Gently crack egg into pan. Allow whites to cook through, then flip. Top vegetables with soft poached egg. Sprinkle with sea salt and pepper.

3. Break yolk and mix ingredients. Serve immediately.

IMG_5893