Vietnamese Spring Roll Party

image4-e1430136830473.jpg

image It all began in the pedicure chair. My friend (and pedicurist) Kathy and I were not discussing gossip or boyfriends, but rather the science behind perfect peanut sauce. I simply couldn't master it. Hoisin, peanut butter and sugar were all it took; yet the ratios were not in my favor during each kitchen trial.

Saturday morning, Kathy surprised me with a homemade batch of her peanut sauce, which, yes, was fantastic. I went to Fresh Market soon after for spring roll ingredients and invited a few friends over for the fun. Both the set-up and finished product were ideal for small gatherings. Spring rolls are creative, customizable, colorful, healthy...Need I say more?

image

What you'll need:

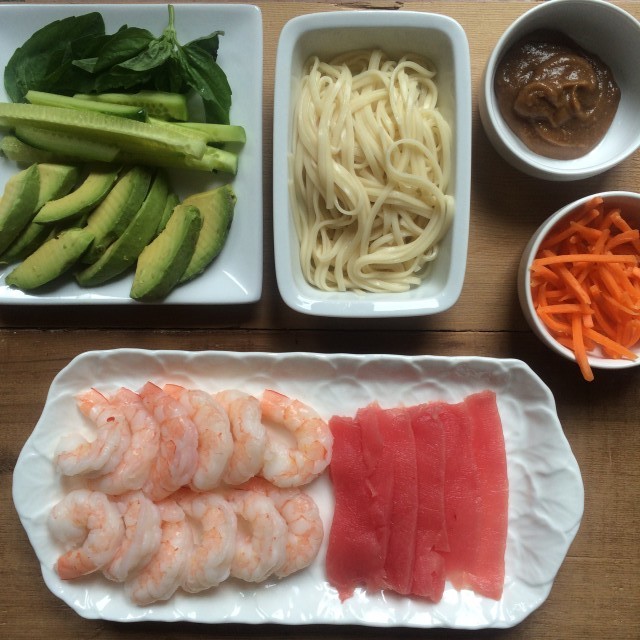
Rice paper Boiled shrimp, butterflied Thinly sliced sashimi tuna Lump crab meat Sliced avocado Sliced cucumber Basil leaves Carrots Udon or vermicelli noodles Peanut sauce, for dipping

1. Fill a casserole dish with warm water and place directly next to a large cutting board. Carefully add one rice paper round to the dish, pressing gently to soften the textured ridges.

2. Carefully remove rice paper from dish after 15 seconds. Begin with a small handful of noodles in the center of the rice paper round. Add 3 butterflied shrimp slices, 1 slice of tuna, and a tablespoon of crab. Then, layer cucumber, 2 avocado slices, and carrots. Customize as you wish!

3. Fold in right and left sides first, then roll tightly. Serve at room temperature (or chilled) with peanut sauce.

image image

Halibut with Edamame and Truffled Cauliflower Rice

Processed with VSCOcam with f2 preset I have been craving a clean, bright plate since Spring officially commenced. And, of course, the halibut was looking fine as ever at The Fresh Market. I innocently experimented with broiler and the food processor Monday evening during a unusually calming thunderstorm; no cookbook, no ripped pages of Bon Appetît. All trial and (a little bit of) error. I taught myself how to properly broil fish and reminded myself to let the simple flavors shine. No need for cream or butter or excessive spices. Just as Anna Watson Carl preaches: It's about celebrating the natural, authentic flavors of fresh ingredients.

According to my calculations, this gluten-free recipe is only 400 calories yet 54 grams of protein! The dish results in a satisfying stomach and a beautiful color palette for the spring season.

P.S. I've heard that the cauliflower rice is a fantastic substitute in homemade fried rice. Simply stir in some scrambled egg, soy, sesame oil, and veggies. I am trying it as soon as possible, so I'll be sure to share photos and thoughts.

Makes 1 serving

1 6-ounce filet of halibut, skin removed 1 teaspoon olive oil Porcellino's Lil Ray seasoning (salt, thyme, lemon zest, sugar) 1/2 cup frozen shelled edamame, shelled 1/2 cup spinach 1 cup cauliflower 1 teaspoon truffle oil Salt and pepper, to taste

1. Preheat broiler on high for 7-10 minutes. Brush both sides of halibut with olive oil and place on foiled baking sheet. Sprinkle with seasoning.

2. Meanwhile, microwave cauliflower in microwave-safe bowl for 2 minutes until steamed. Set aside to slightly cool.

3. Heat small saucepan on medium heat. Place fish in oven, keeping a close eye on the filet. Cook for 6-8 minutes, or until cooked through.

4. Sauté edamame and spinach in small saucepan until wilted, about 3-4 minutes. Add salt and pepper as needed.

5. While edamame and spinach are cooking, place cauliflower in a food processor. Pulse until consistency is a fine rice shape. Transfer cauliflower to serving plate. Drizzle with truffle oil.

6. Top cauliflower with edamame/spinach, then filet. Serve immediately.

Honey Roasted Radishes

April miraculously arrives tomorrow, welcoming an abundance of color and springtime splendor to our weekend agendas and daily wardrobes. I am more-than-ever ready for this upcoming month. Last night, I experimented with a refrigerator staple -- radishes -- that typically brighten lunchtime salads or open-faced sandwiches. However, I took it up a notch, placing these roots in the oven rather than serving raw. IMG_4819

The result was game-changing: The bright fuchsia skin fades to a stunning, soft lavender upon heating, and the spice is subdued by sweet and salty notes of Nature Nate's honey and flaky Porcellino's blended sea salt. I would argue that this honey-roasted, gluten-free side dish (served on a Paper & Clay original) is the perfect accompaniment to Easter lunch and springtime patio suppers. Here's to Spring and the transformation of a gorgeous produce into a show-stopping dish!

Share your own Nature Nate’s honey creations on social media with @naturenates and #honeymakesitbetter!

Processed with VSCOcam with f2 preset

IMG_4803

Makes 4 servings

1 package pre-washed radishes, halved 1 tablespoon Nature Nate's honey 1 teaspoon olive oil Flaky sea salt

1. Preheat oven to 450 degrees. Spray non-stick spray in a cast iron skillet. Arrange radishes, face-down (pink up) in the skillet.

2. Drizzle olive oil, a generous portion of salt, and honey over the radishes. Place in the oven and roast for 20 minutes. Serve on a Paper & Clay serving piece.

This post is in partnership with Nature Nate’s. Thank you for being supportive of my sponsors!

IMG_4808

Meatballs with Mushrooms

Processed with VSCOcam with f2 preset

Sundays are dubbed "Italian night" in my kitchen, and I've been pushing myself to expand my cooking expertise beyond seafood. Last night, I created a flavorful, light-as-air meatball that stands alone so beautifully, pasta is not even required. The woodsy baby bella mushrooms add another note of dark, rich hues without adding extra carbs. Next time, I'll add slivers of fresh garlic to the tomato sauce before plating on my Paper & Clay piece. Enjoy your Monday (with meatballs, perhaps)!

Makes 2 servings

1/2 pound ground lean beef 1 egg 1/4 cup Italian bread crumbs 1/8 cup grated parmesan 1 tablespoon finely chopped parsley, plus extra for garnish Salt and pepper 1 tablespoon canola oil 1 tablespoon butter 8 baby bella mushrooms, sliced 1/4 cup tomato sauce

1. In a small bowl, place meat, egg, bread crumbs, parmesan, parsley, salt and pepper. Use your hands to combine ingredients. Create six 2-inch diameter meatballs.

2. In a small cast-iron skillet, heat canola oil over medium-high heat. Add meatballs, one by one, and sear for 2-3 minutes until bottoms are gold brown. Flip and repeat. Turn down heat to medium and continue to sear until cooked-through, approximately 10 minutes. Keep warm on low heat.

3. Meanwhile, heat butter in a small saucepan on medium heat. Add mushrooms and caramelize for 8-10 minutes, stirring occasionally.

4. Once mushrooms are cooked, divide onto two dinner plates. Return saucepan to stove and add tomato sauce, heating on medium heat until hot. Add three meatballs to each plate. Top with tomato sauce, parmesan cheese, and parsley. Serve immediately.

IMG_4778

Cheesy Peasant Potatoes

Following the ArtsMemphis culinary series dinner at the James Lee House, I luckily learned a few culinary secrets in the kitchen of Master Chef Jose Gutierrez. Chef Jose, a mentor and friend, is known for his thirty plus years of experience in and influence of the Memphis fine dining scene. I'm a raving fan of his work and his culinary philosophy: "simultaneously feeding the body, the soul, and the intellect."

Chef Jose understands my desire for simplicity on one's plate and palate, hence why my first private cooking lesson revolved around the simple stove-top filet with shallot, mushroom, and to-die-for cheesy peasant potatoes. Minimal ingredients, minimal equipment and time, and maximum quality.

A few tips I took with me (that I'll gladly share with you!):

1. Soak potatoes in water once they're sliced. They'll stay bright white, and the extra starch (that usually makes them stick together) will remove itself.

2. Just because you pour a bunch of oil in the pan doesn't mean you have to eat it. The more oil, the more crispiness; but drain the pan throughout cooking, and you'll be avoiding the unhealthy foundation.

3. Everything needs parsley. Trust Jose.

Oh, and FYI: A sprinkle of cheese completely elevates the following side dish. No need for more than an ounce.

Processed with VSCOcam with f2 preset

Makes 2 servings

1 potato, peeled and sliced super thin 1 tablespoon parsley, finely chopped 2 tablespoons canola oil 1 ounce shredded mozzarella Salt and pepper

1. Heat canola oil in a small saucepan over medium-high heat. Meanwhile, place sliced potatoes in a small bowl of water to remove extra starch.

2. Add potatoes to pan and spread evenly. Sprinkle with salt and pepper. Do not flip until underside begins to get crispy, approximately 3-4 minutes. Once crispy, flip allow other side to cook evenly.

3. Once potatoes are fully cooked, turn off stove and add mozzarella. Quickly toss potatoes until cheese begins to melt. Add generous sprinkle of parsley and remove from pan. Serve warm.

 IMG_3278

Skillet Shortcut Shakshouka

This one-dish dinner became the culmination of a "Chopped"-like personal challenge. My fridge was bare on a Monday evening (I had yet to make my weekly grocery run), and I was only left with four ingredients: an avocado, tomato, half a sweet onion, and eggs. Being the kitchen nerd that I proudly am, I found myself in the Williams Sonoma outlet the morning beforehand and collected some cute-but-totally-unecessary gadgets. Amongst the pile of new linen napkins, a spiralizer, and spoons, I bought a 6-inch mini cast iron skillet. Adorable and affordable, might I add! The low and slow cooked onions and tomatoes created a rich base for boiled eggs and diced avocado, all of which I could prep, cook, and eat in one skillet. The result? A shortcut shakshouka, my official go-to dinner for one.

IMG_3367

Makes 1 serving

2 eggs 1 roma tomato, diced 1/2 sweet onion, diced 1/2 avocado, diced 1 tablespoon olive oil Sprinkle of mozzarella cheese Fresh herbs on hand, minced

1. Heat olive oil in a small cast iron skillet on medium heat. Add onions, cooking until translucent, about 5 minutes. Then, add tomatoes and continue to cook for another 5 minutes.

2. Turn broiler on high. Create two spaces in the skillet to carefully crack the eggs. Leave skillet on the stove for 2 minutes, then turn off stove and add to the broiler for 2 more minutes, until egg whites are cooked through.

3. Return skillet to the stove and top with sprinkled cheese and herbs. Add avocado and enjoy immediately.

IMG_3366

IMG_3368